Once you are a My Lowes Account holder, you can shop online at lowes.com. Log in to your personal or pro account to access your orders, lists, add and manage your gift cards.
Log in Lowes Online
To sign in you must:
- At the official lowes.com portal choose Sign in, then click on Sign in or Create Account or go to lowes.com/login.
- In the next form you will see a welcome message «Hi, Welcome to Lowe's» where you will have to fill in the fields:
- Email Address you used when you registered;
- Password.
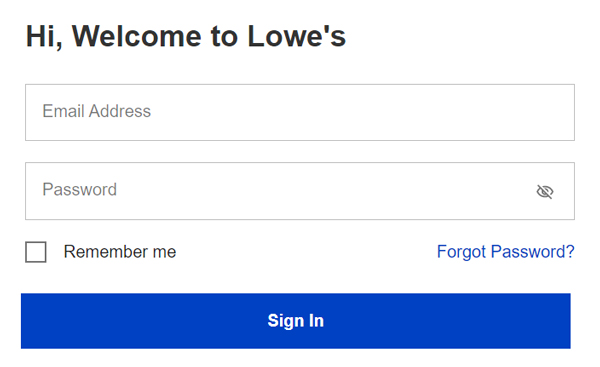
Important: Check the box "Remember me" so you will not have to enter any data the next time you login.
- Click on Sign In.
When Log in My Lowes Account Failed
Sometimes Lowe's users may have problems when they try to sign in to MyLowes Account. After clicking Sign In you may see the following warning message: «Login Failed. The email address or passcode you entered doesn't match our records. Please give it another try».
This error occurs in the following cases:
- If you made a grammatical mistake when writing your e-mail;
- You have entered email address other than the one you specified during registration.
Errors that refer to the password:
- «At least 1 letter and 1 number with no spaces».
- «Enter a valid password with at least 8 characters».
- «Max of 3 consecutive characters allowed».
You can click on to see the passcode in the field and check if it is typed correctly.
How to Change Password
If you do not remember your password, you should change it:
- Press Forgot password? or Sign In With One-Time Passcode.
- Then indicate the email address related with your Lowe's account and tap Continue.
- Check your inbox, you should have received a one-time passcode.
Important: If you did not see an email from Lowes in your inbox, check the Spam Folder.
- Enter temporary password and press Verify.
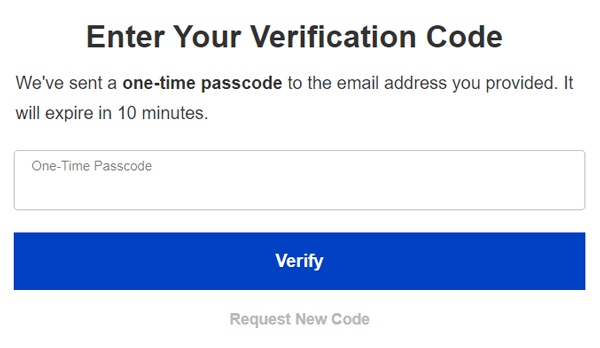
Important! The temporary password is valid for 10 minutes. If you do not fit into this timeframe for any reason then click on Request New Code.
- Then enter a new password that meets all the requirements and click Save & Sing in.
How to Create My Lowes Account
In order to sign up and get all the benefits of shopping online with Lowes you need:
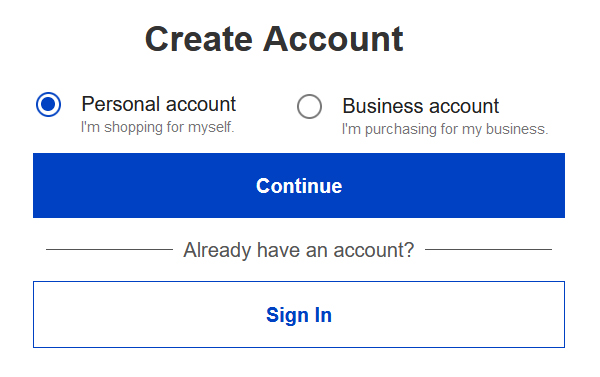
- On the official lowes.com website in the top right side click on Sign in, then click on Sign in or Create Account, then click on Create Account. Or go directly to lowes.com/register.
- On the next form, you will need to select your account type. Select:
- Personal Account, if you’re going to shop for yourself;
- Business Account, if you will be purchasing for your business.
Create a Personal Account
If you are creating a Personal Account, you will need to fill out the following fields at the form:
- First name;
- Last name;
Important: Please enter your first and last name as it is on your passport/driving license.
- Email address;
- Phone number as XXX-XXX-XXXX;
- Password;
Important! Passwords are case-sensitive and must meet all requirements:
- Be 8 to 12 characters in length;
- Include at least 1 letter and 1 number;
- Contain no spaces;
- Maximum of 3 consecutive characters.
Optionally you can check the box «I'd like to receive exclusive email offers, special promotional and project inspiration». You can unsubscribe from this mailing list at any time.
If all the data is correct, when you click Create Account you will see a notice «Thank You! You've successfully created a new MyLowe's account! Now you can enjoy faster shopping, faster checkout, creating wishlists, and more».
Create a Pro Account
If you need Lowe's login for your business, at the stage of registration, after you have chosen «Business Account» and clicked «Continue»:
- Indicate an email address that isn't related with another account and click Continue.
Important! If you are already using your business email for your personal account, please log in and change it before continuing.
- In the next step you can:
- Join an existing company, for that please enter Pro Account ID.
Important: Pro Account IDs are provided by your account admin. Contact your account admin to request ID to access your organization's profile.
- Add a company you work in, as a new one.
- Join an existing company, for that please enter Pro Account ID.
- Choose a new organization type:
- Business;
- Government/Non-Profit Organization.
- Fill in mandatory fields with information about your business name, address, city, state, Zip code, phone and EIN/Federal Tax ID.
- You can also fill in Additional Organization Information, these fields are optional:
- Branch name;
- Purchasing contract type.
- Fill in your personal information name, surname, phone number and select Industry.
- Type your password and click Create Account.
Update as of: February 20th, 2025.

